Friday, September 28, 2012

Lentils with Eggplant and Garam Masala

I've prepared several recipes with eggplant this past month, but I haven't recently given eggplant an Indian twist. Seeing as how eggplant originated there, it seemed fitting to cap off September with this Indian-spiced recipe. There are two parts to my post tonight: start with a homemade garam masala spice blend, and then move on to the lentils themselves. If you prefer, you can find pre-ground garam masala in the spice section of the grocery store.

Ingredients:
For the Garam Masala:
  • 2 tablespoons coriander seeds
  • 2 tablespoons cumin seeds
  • 2 tablespoons black peppercorns
  • 1 and 1/2 teaspoons whole cloves
  • 3/4 teaspoon cardamom seeds
  • 1 cinnamon stick
1. Heat a medium skillet over medium heat, and add all the ingredients.  Cook for 2 minutes, stirring frequently, until the spices are toasted.


2. Transfer the spice mixture to a spice grinder and process until finely ground.


Note: you 'll have more spice mixture than you need for the following recipe, but there are plenty of ways to use the left-overs.

Rub over tofu slices before pan-searing:


Stir a little into couscous for a quick, spiced side dish:


Or sprinkle over steamed vegetables:


The garam masala will keep well in the freezer for up to 6 months.

Nutrition Info:
18 servings (1 teaspoon), Calories 1.5

And now on to the main event:

Ingredients:
  • 2 teaspoons olive oil
  • 1 cup chopped onion
  • 1 and 1/2 teaspoons Garam Masala
  • 1 cup chopped tomato
  • 1 teaspoon ground turmeric
  • 1 teaspoon peeled and grated fresh ginger
  • 2 minced garlic cloves
  • 1 (1-pound) eggplant
  • 1 cup dried lentils
  • 4 cups water
  • 1 and 1/2 teaspoons salt
  • 2 bay leaves
  • 2 cups chopped zucchini
  • 4 and 1/2 cups hot cooked basmati rice
1. Heat the olive oil in a Dutch oven over medium-high heat.  Add the onion and Garam Masala; saute for 3 minutes.  Peel and chop the eggplant, and add to the pan, along with the tomato, turmeric, ginger, and garlic. Saute for 7 minutes, until the eggplant is tender.


2. Add the lentils, water, salt, and bay leaves.  Bring to a boil.  Cover, reduce heat, and simmer for 15 minutes.  Stir in the zucchini and return to a boil.  Reduce the heat and simmer for a final 10 minutes, until the zucchini is tender.  Discard the bay leaves.

3. Meanwhile, prepare the rice according to package directions.  Serve 1 and 1/4 cups lentil mixture over 3/4 cup rice on each of 6 plates.


Nutrition Info:
6 servings (1 and 1/4 cups lentil mixture, 3/4 cup rice), Calories 447 

Tasting Notes:
I really enjoyed the tender eggplant and lentils, but surprisingly, this dish is a touch bland. Since you've gone to the trouble of making all that Garam Masala, I recommend adding at least a teaspoon more. The recipe would also benefit from tomato paste, in addition to the chopped tomato, and perhaps a little more olive oil. Still, very nice Indian flavors, minus the heaviness and oiliness characteristic of dishes served at Indian restaurants here in the States.

Rating:
3

Thursday, September 27, 2012

Eggplant and Chickpea Dip with Mint

I was a little disappointed with a Baba-Gha Hummus dip I prepared for this blog back in May. Tonight I thought I'd play around with a slightly different version. This one is creamier, with more garlic, lemon juice, and the surprising addition of mint.

Ingredients:
  • 1 whole garlic head
  • 1 (1-pound) eggplant
  • 2 tablespoons toasted sesame seeds*
  • 1 tablespoon chopped fresh mint
  • 3 tablespoons fresh-squeezed lemon juice
  • 1 tablespoon olive oil
  • 1 teaspoon sea salt
  • 1/4 teaspoon ground red pepper
  • 1 (15.5-ounce) drained can chickpeas
1. Remove the white papery skin from the garlic head, but do not peel or separate the cloves. Wrap the garlic in aluminum foil and bake at 450 degrees for 45 minutes.


2. At the same time, cut the eggplant in half lengthwise and place, cut sides down, in a baking pan.  Add enough water to fill the pan to a depth of 1/4-inch (doing so helps add moisture, and will result in a creamier dip).  Bake in the oven with the garlic, but remove after 30 minutes.


3 Let both the eggplant and garlic cool for 10 minutes once out of the oven. Scrape the pulp from the eggplant skins and discard the skins.  Separate the garlic cloves and squeeze to extract the pulp; discard the skins.

4. Combine the eggplant and garlic pulp in a food processor with the sesame seeds, mint, lemon juice, olive oil, salt, ground red pepper, and chickpeas.  Process until smooth.

Serve with lightly toasted pita bread wedges.


*Just like nuts, you can quickly toast sesame seeds in a skillet over medium heat for about 3 to 4 minutes, until fragrant and lightly browned.

Nutrition Info:
10 servings (1/4 cup), Calories 84 

Tasting Notes:
Pretty much everything I was hoping it would be: creamy consistency, a nice balance of the chickpea and eggplant, bright lemon flavor, and quite the bite from the garlic. I love garlic, so loved this, but if you're not a huge fan, you might consider using only half the cloves from the head. The one missing element was the mint, which got lost under all the rest; I recommend doubling the amount called for - especially because it's in the recipe title.

Rating: 
3.5

Wednesday, September 26, 2012

Baked Rice with Butternut Squash

I like to refer to oven-baked rice dishes as lazy-man's risotto, and I seem to have better results when I cook Arborio rice (or other short-grain rices) in this fashion. Butternut squash makes this take on it just right for fall.  If you're reading this post in the spring, check out my recipe for Baked Risotto with Asparagus, Spinach, and Cheese.

Ingredients:
  • 1 (1 and 1/2-pound) butternut squash
  • 2 cups vegan chicken broth (such as Imagine)
  • 1 cup water
  • 1 tablespoon chopped fresh sage*
  • 1 teaspoon olive oil
  • 1 cup diced onion
  • 2 minced garlic cloves
  • 1 cup uncooked Arborio rice
  • 1/4 cup vegan dry white wine
  • 1 teaspoon chopped fresh thyme*
  • 1/2 teaspoon salt
  • 1/4 teaspoon black pepper
  • Cooking spray
  • 1/4 cup grated vegan cheese
  • Fresh thyme sprigs (optional for garnish)
1. Place the butternut squash on a baking sheet and bake at 350 degrees for 30 minutes, until tender.  Let cool before peeling (a vegetable peeler works just fine). Cut in half lengthwise, discard the seeds and membranes, and cut into 1/2-inch cubes.  Set aside.


Note: you can prepare the squash up to 2 days ahead at this point, and store the cubed squash in the fridge.

2. In a saucepan, combine the broth, water, and sage.  Bring to a simmer, but do not boil.

3. Meanwhile, heat the olive oil in a large skillet over medium-high heat.  Add the onion and saute for 6 minutes.  Add the garlic; saute for 2 minutes.  Add the rice and saute for 1 minute.

4. Stir in the cubed squash, warm broth mixture, white wine, chopped thyme, salt, and black pepper.  Cook for a final 5 minutes, stirring occasionally.


5. Transfer the rice mixture to a 13x9-inch baking dish coated with cooking spray.  Bake at 400 degrees for 25 to 30 minutes, just until the liquid is absorbed.  Remove from the oven and stir gently; sprinkle with the cheese and return to the oven for a final 5 minutes.  Fresh thyme sprigs make a lovely garnish when serving.


Note: for the cheese, I used the the vegan mozzarella block from Galaxy Foods, which grates well to mimic a hard white cheese like Parmesan. For more fun with products from Galaxy Foods, you might also check out their recent food demo for PETA.

Tonight, I paired this dish with the stuffed chicken from Match - already prepared and sold frozen, the folks at Match have stuffed their vegan chicken with a beautiful blend of tofu, kalamata olives, and spinach. Add a watercress salad and bread rolls on the side to round out the meal:


Pour a crisp (vegan) white wine to serve with this dish, such as fume blanc.

*A note on the herbs - I preferred using fresh (particularly so I had extra thyme sprigs for garnish) but you can substitute 1 teaspoon dried rubbed sage and 1/4 teaspoon dried thyme for the fresh herbs in a pinch. 

Nutrition Info:
6 servings (about 1 cup), Calories 186 

Tasting Notes:
Yum - I felt like the fall harvest had landed on my plate. Full of buttery butternut squash and earthy sage and thyme. I am consistently impressed with how baking in the oven yields perfectly-cooked rice, tender and creamy but not mushy like a stove-top risotto can sometimes be.  The dish tasted quite simply of its few components, which is why I'm not rating it higher - nothing exquisite going on here, but if you're looking for a warming, fall-flavored rice dish, this is your recipe.

Rating:
3.5

Monday, September 24, 2012

Shrimp and Butternut Squash in Coconut Milk Broth

If you're looking for new and inventive ways to feature fall's bumper crop of winter squashes, try trolling through different cuisines for inspiration. This stew features Thai flavors like coconut milk, lime, and cilantro. If you don't have Sophie's vegan shrimp on hand - or prefer not to use faux seafood - this stew would be just as good with tofu. Substitute 1 pound cubed firm tofu for the shrimp.

Ingredients:
  • 3/4 cup vegan chicken broth (such as Imagine)
  • 1 and 1/2 teaspoons vegan brown sugar
  • 1 teaspoon coarse salt
  • 2 teaspoons tomato paste
  • 1/4 teaspoon crushed red pepper
  • 1/4 teaspoon black pepper
  • 1 (14-ounce) can light coconut milk
  • 2 cups (3/4-inch) peeled and cubed butternut squash
  • 1 cup (1-inch long x 1/4-inch wide) julienne-cut strips red bell pepper
  • 12 ounces Sophie's Kitchen shrimp, thawed
  • 2 cups hot cooked basmati rice
  • 1/4 cup fresh-squeezed lime juice
  • 3 tablespoons minced fresh cilantro
1. Combine the broth, brown sugar, salt, tomato paste, crushed red pepper, black pepper, and coconut milk in a large saucepan, stirring with a whisk until blended.  Add the butternut squash and bell pepper; bring to a boil.  Reduce heat and simmer for 10 minutes - the squash should be just tender.


2. Cut each shrimp in half lengthwise and add to the pan.  Return to a boil and cook for a final minute.  Stir in the cooked rice, lime juice, and cilantro.


Nutrition Info:
4 servings (1 and 3/4 cups), Calories 294 

Tasting Notes:
A surprising bit of heat from the crushed red pepper, tamed by the coconut milk, and accentuated by the tart lime and the cilantro. The squash was unexpected but works great in this application. Although the shrimp were certainly fun, I would use tofu next time, in which case I'd rate this soup even higher. Overall, flavorful and hearty.

Rating:
4

Sunday, September 23, 2012

Spiced Red Lentil Dip with Pita Crisps

From a nutrition standpoint, lentil varieties are pretty similar. But I've always found red lentils to be the prettiest, which is why I like them in this dip. If you don't have red lentils on hand, though, go ahead and use brown or green.

Ingredients:
For the dip:
  • 1 cup dried small red lentils
  • 1 bay leaf
  • 1 tablespoon olive oil
  • 1 cup finely chopped onion
  • 2 tablespoons pine nuts
  • 1 tablespoon tomato paste
  • 1 teaspoon fine sea salt
  • 1 teaspoon ground coriander seeds
  • 1/2 teaspoon ground cumin
  • 1/2 teaspoon ground caraway seeds*
  • 1/8 teaspoon ground red pepper
  • 3 minced garlic cloves
  • 3 tablespoons fresh-squeezed lemon juice
For the pita crisps:
  • 4 (6-inch) pitas
  • Cooking spray
  • 1/8 teaspoon fine sea salt
  • 1/8 teaspoon black pepper
1. To prepare the dip, combine the lentils and bay leaf in a saucepan and cover with water to 2 inches above the lentils.  Bring to a boil.  Cover, reduce heat, and simmer for 8 minutes - the lentils should be tender.  Drain and discard the bay leaf.


2. Meanwhile, heat the olive oil in a small skillet over medium-high heat.  Add the onion and pine nuts; saute for 5 minutes; the pine nuts should be lightly browned.  Stir in the tomato paste, 1 teaspoon salt, the coriander, cumin, caraway, ground red pepper, and garlic.  Cook for 5 minutes, stirring occasionally.  Stir in the lemon juice.


3. Combine the cooked lentils and onion mixture in a food processor and process until smooth.

4. Meanwhile, prepare the pita crisps.  Cut the pitas into 5 wedges each, and coat 1 side of each pita wedge with cooking spray.  Sprinkle the wedges evenly with 1/8 teaspoon salt and the black pepper.  Arrange the wedges in a single layer on a baking sheet and bake at 350 degrees for 20 minutes, until nicely golden.


Serve the dip with the pita crisps. You can also add crudites, like cauliflower, for dipping.


*You'll probably find most of the spices called for in this recipe sold already ground, with the exception of caraway seeds. Luckily, it's easy to grind your own at home from whole caraway seeds with a coffee or spice grinder, and indeed, makes for stronger fresher taste. Likewise, you can freshly grind a small amount of whole coriander or cumin seeds.

Nutrition Info:
10 servings (1/4 cup dip, 2 pita crisps), Calories 159 

Tasting Notes:
I have no complaints when it comes to taste - wonderful spice to the lentil mixture, and an almost "cheesy" flavor from the toasted pine nuts and onion.  The pitas were perfectly salted and peppered, for great taste there too. My criticisms all have to do with texture. The lentil "dip" was much too thick, and I would add broth or olive oil or both to make it creamer. The pita crisps live up to their name, as crisp as a chip. Unfortunately that's not my preference, so I would only bake them for 10 minutes next time. A "4" for taste, but minus some points for those reasons.

Rating:
3.5

Saturday, September 22, 2012

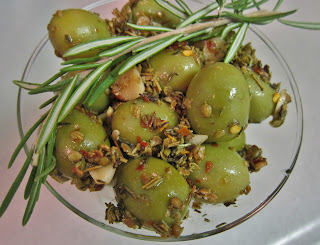
Marinated Spanish Olives

These marinated olives make a great party appetizer. Spanish olives are a green variety - buy large ones for this recipe, since they come in varying sizes.

Ingredients:
  • 24 unpitted Spanish olives
  • 2 tablespoons sherry vinegar
  • 1 tablespoon olive oil
  • 2 teaspoons coriander seeds
  • 1 teaspoon dried thyme
  • 1 teaspoon dried rosemary
  • 1/2 teaspoon crushed red pepper
  • 2 thinly sliced garlic cloves
  • Fresh rosemary sprigs (optional for garnish)
1. Crush the coriander seeds and rosemary with a mortar and pestle - you don't need them to be finely ground, just slightly crushed.


2. Combine the coriander and rosemary in a bowl with all the remaining ingredients except the rosemary sprigs.  Cover and marinate in the fridge for at least 8 hours, but bring back to room temperature before serving. Add rosemary sprigs for a pretty garnish if you like.


Note: you can even prepare and refrigerate these olives up to a full week ahead, and the flavor will only get better over time.

A perfect nosh with a bubbly glass of Spanish cava:


Nutrition Info:
6 servings (4 olives), Calories 49 

Tasting Notes:
A delectable appetizer, with big flavor; you really only need to nibble on a couple olives to whet your appetite, which is exactly what an appetizer is supposed to do. The rosemary was my favorite part, and also the flavors of the vinegar and coriander, and the meaty olives underneath. Sips of cava were creamy and refreshing compared to the natural brininess of the olives, so I highly recommend it.

Rating:
3.5

Thursday, September 20, 2012

Soft Chicken Tacos

These tacos are super speedy. Bake 3 Gardein chicken breasts in advance, according to package directions, then shred with a fork or by hand, and set aside until ready to assemble the tacos.

Ingredients:
  • 2 cups shredded and cooked Gardein Tuscan chicken breast (without sauce)
  • 1/2 cup chopped fresh cilantro
  • 1/2 cup bottled chipotle salsa (such as Muir Glen)
  • 8 (6-inch) flour tortillas
  • 1 cup chopped tomato
  • 1/2 cup shredded vegan cheddar
  • 1/2 cup peeled and diced avocado
  • 1/4 cup lite vegan sour cream (such as Vegan Gourmet)
1 Combine the chicken, cilantro, and salsa in a bowl; set aside.

2. Spoon about 1/3 cup chicken mixture onto each tortilla.  Microwave the tacos separately, for 30 seconds each.


3. Top each taco with 2 tablespoons tomato, 1 tablespoon cheddar, 1 tablespoon avocado, and 1 and 1/2 teaspoons sour cream, and fold in half to serve.


Well hello there, awesome bite.


A tomato-and-onion salad makes a nice side dish. I copied this recipe tonight, which required nary a change to be vegan. 


Nutrition Info:
4 servings (2 tacos), Calories 404

Tasting Notes:
Just yum! I loved the subtle smokiness of the chipotle salsa, which added just the right touch of heat. The rest of this meal was a perfect flavor combination - fresh tomato and avocado, savory vegan cheddar and chicken, and creamy sour cream. A perfect bite, and even better because the meal is so quick to throw together.  Sure to become a weeknight staple. 

Rating: 
5

Wednesday, September 19, 2012

Harvest Pear Crisp

This dessert makes a lovely finish to a late September meal, now that pears are in peak season. Fruit crisps have all the flavors of a fresh-baked pie, but are much simpler to put together.

Ingredients:
  • 6 cups (1/2-inch thick) sliced Anjou pear*
  • 1 tablespoon fresh-squeezed lemon juice
  • 1/3 cup vegan sugar
  • 1 tablespoon cornstarch
  • 1 and 1/2 teaspoons ground cinnamon, divided
  • 1/3 cup all-purpose flour
  • 1/2 cup packed vegan brown sugar
  • 1/2 teaspoon salt
  • 3 tablespoons vegan butter
  • 1/3 cup regular oats
  • 1/4 cup coarsely chopped walnuts
1. Combine the sliced pears in a 2-quart baking dish with the lemon juice, tossing to coat.  In a small bowl, whisk together the sugar, cornstarch, and 1 teaspoon of the cinnamon; add the cornstarch mixture to the pear mixture and toss to coat.


2. Lightly spoon the flour into a dry measuring cup and level with a knife.  Combine the flour in a food processor with the remaining 1/2 teaspoon cinnamon, brown sugar, and salt; pulse 2 to 3 times, until the mixture is combined.  Cut the butter into small pieces, and add to the food processor; pulse 6 to 8 times, until the mixture resembles coarse meal.

3. Add the oats and walnuts and pulse a final 2 to 3 times.  Sprinkle the flour mixture evenly over the pear mixture.


4 Bake at 375 degrees for 40 minutes - the pears should be tender and the topping a nice golden brown.  Let cool on a wire rack for at least 20 minutes, at which point you can serve the crisp warm, or let it cool further to room temperature.


This crisp is incredibly versatile when it comes to making it for company; prepare it in advance, and pop in the oven when guests sit down to dinner.  Or even easier, bake it in advance, and just bring back to room temperature before serving.

It's perfect a la mode with a scoop of vanilla Soy Delicious ice cream:


Or for a more grown-up treat, try pairing with a late harvest (ice wine) Riesling:


I have a weakness for sweet dessert wines like this, and have been on the lookout for a certified vegan one for ages. I finally found a gem of a New York winery, King Ferry Winery, which specifies that their late harvest Riesling - as well as other varietals from their estate - are vegan-friendly. You can order the late harvest Riesling here. 

*I specify Anjou pear for this recipe because its rounder shape makes for more even slices, and it holds up well during baking. Bartlett pears would also work nicely, however. Core the pears first, then cut lengthwise into slices.


Nutrition Info:
8 servings (1 portion), Calories 285 

Tasting Notes:
Decadently delicious although - and here's something I don't say very often - a little too sweet.  Between the granulated sugar in the filling and the brown sugar on top, this was sugar sugar sugar in every bite. I'd prefer if the pears took center stage, and would decrease the sugar significantly. But the rest was great; I loved the rustic feel from leaving the peel on the pears, and the oats and walnuts in the topping were toasted and warm. Serving with vanilla soy ice cream added a layer of creaminess to the dish, and it brought out the best in the sweet sips of dessert wine.

Rating:
4

Monday, September 17, 2012

Roasted Butternut Squash with Herbes de Provence

The mornings are getting chillier, which can only mean one thing: The beginning of fall - and with it, fall produce - is upon us. One of the first things I reach for this time of year is the butternut squash that comes into the market. This preparation features squash simply roasted with the French mixture of lavender, rosemary, thyme, marjoram, and sage, known as herbes de Provence. 

Ingredients:
  • 6 cups (1 and 1/2-inch) peeled and cubed butternut squash*
  • 1 tablespoon olive oil
  • 1 and 1/2 teaspoons dried herbes de Provence
  • 3/4 teaspoon coarse salt
  • 1/2 teaspoon black pepper
  • 2 medium onions (about 12 ounces)
  • Cooking spray
1. Coat a roasting pan with cooking spray. Cut the onions into 8 wedges each, making sure to leave the root intact so the wedges hold together while baking.

2. Combine the onion wedges in the roasting pan with all the remaining ingredients, and toss well to combine.  Bake at 425 degrees for 30 minutes, stirring occasionally (every 10 minutes or so).  The vegetables should be lightly browned and tender by the end.


*The easiest way to chop an uncooked butternut squash is to cut it in half crosswise, just above where the bulbous end tapers, as shown in the photo below. Scoop out the seeds, and use a vegetable peeler or knife to remove the rind, then chop into cubes. Start with a 2 and 1/2 pound squash to yield the 6 cups needed here.


Nutrition Info:
4 servings (1 cup), Calories 125 

Tasting Notes:
Wonderfully, perfectly tender squash, with that rich buttery taste that earns it it's name.  The onions were also roasted to sweet perfection.  Next time, I would omit the salt and pepper and let the herbes de Provence do all the talking.

Rating:
3.5

Sunday, September 16, 2012

Chicken Cacciatore

Start with Gardein's frozen chicken scallopini to prepare this cacciatore-style dish. Ignoring the fact that cacciatore means "hunter" in Italian, in culinary terms it refers to a preparation of tomatoes, onions, bell peppers, herbs, and red wine - the simple pleasures of Italian flavors, in other words. I used quick shortcuts like frozen cut veggies tonight, but you could use fresh if you prefer.

Ingredients:
  • 3 tablespoons all-purpose flour
  • 1/2 teaspoon salt
  • 1/2 teaspoon dried thyme
  • 1/2 teaspoon fennel seeds
  • 1/4 teaspoon black pepper
  • 4 Gardein chicken pieces
  • 1 teaspoon olive oil
  • Cooking spray
  • 2 cups frozen pepper stir-fry (such as Whole Foods southwestern blend)
  • 1 cup frozen chopped onion
  • 1/2 cup vegan dry red wine
  • 2 (14.5-ounce) drained cans diced tomatoes
  • 1 bay leaf
1. Combine the flour, salt, thyme, fennel, and black pepper in a large zip-top plastic bag.  Defrost the chicken in the fridge or microwave just slightly, and add to the bag; seal and shake to coat.


2. Heat the olive oil in a large skillet coated with cooking spray over medium-high heat.  Add the chicken pieces and cook for 5 minutes, turning over halfway through.  Add the frozen pepper stir-fry, frozen onions, red wine, tomatoes, and bay leaf.  Cover and cook for 8 minutes.


3. Uncover and cook a final 3 minutes, until the mixture is somewhat thick. Discard the bay leaf.

For the best flavor, serve over a long thin pasta (I used angel hair, but spaghetti, linguine, or any other long noodle would work). Then just add a garden salad and fresh Italian bread on the side to round out the meal.


Nutrition Info:
4 servings (1 and 1/4 cups), Calories 223 

Tasting Notes:
My favorite part of this dish by far - and unexpectedly - was the strong licorice notes from the fennel seeds. A delicious surprise, that makes the rest of the dish much better. The rest, unfortunately, was a little bland, tasting like it's various components without being transformed in any way. I would use Gardein's Tuscan chicken breasts next time, which are 'meatier' and would stand up to the heavy sauce better than the scallopini did. I also might play around with a white wine version, because the red wine tinted the chicken a rather unappealing purple.

Rating: 
3.5