Tuesday, May 31, 2011

Polenta with Cheese and Spinach

There are few ingredients in this easy dish, but big flavor results.  Do make sure to buy polenta rather than corn grits - although both items are ground corn, polenta has a finer texture to it.  Also, for the best results, make sure to chop the spinach finely.

Ingredients:
  • Olive oil-flavored cooking spray
  • 2 minced garlic cloves
  • 3 cups chopped fresh spinach
  • 2 cups water
  • 1 and 3/4 cups vegan chicken broth (prepared from Not Chick'n bouillon)
  • 1 cup polenta
  • 1/2 teaspoon salt
  • 1/4 teaspoon black pepper
  • 1/2 cup shredded vegan cheese
1. Heat a medium skillet coated with the olive oil cooking spray over medium-high heat.  Add the garlic and saute for 1 minute.  Add the spinach; cook for 1 minute, until the spinach is wilted.  Remove from heat and set aside.


2. Combine the water and chicken broth in a large saucepan and bring to a boil over medium-high heat.  Gradually add the polenta, stirring constantly with a whisk.  Reduce the heat and cook for 20 minutes, stirring frequently - it will be quite thick by the end.  Remove from heat and stir in the wilted spinach mixture, salt, and black pepper.

3. Spoon the polenta mixture into a 9-inch springform pan coated with the olive oil cooking spray.  Press plastic wrap on the surface of the polenta and chill for 2 hours - it should be firm by the end.

4. Release the polenta from the springform pan and discard the plastic wrap; place on a baking sheet coated with the olive oil cooking spray.  Sprinkle the cheese evenly over the top of the polenta and bake at 400 degrees for 15 minutes.  For the cheese, I highly recommend the shredded mozzarella from Daiya - it has a creaminess that mimics the flavor of Fontina, and works great for this recipe.


5. Remove from the oven and let stand for 5 minutes, then divide into 8 equal portions with a sharp knife.  This dish is best served immediately.

I served the polenta as a side dish, although it certainly could take center stage as your main course as well.  Because the dish has a rustic, simple feel to it, try it with similarly homey foods - for me tonight that meant grilled Match pork patties, and simple balsamic grilled asparagus: in a bowl, combine 1/4 cup balsamic vinegar, 1 teaspoon vegan sugar, 1/2 teaspoon salt, 1/2 teaspoon black pepper, and 2 minced garlic cloves.  Add 2 pounds trimmed asparagus and toss to combine.  Grill for 5 minutes, turning over about halfway through. 


Nutrition Info:
8 servings (1 wedge), Calories 126

Tasting Notes:
So savory and almost creamy - in fact, I would have thought this dish had butter in it, if I hadn't made it myself, between the soft creamy polenta and gooey melted cheese on top.  The spinach gave it just the right unexpected touch.

Rating:
4

Monday, May 30, 2011

Tofu Breakfast Burritos

This tasty burrito recipe makes the perfect centerpiece of a leisurely weekend brunch.  The warm, lazy weekends of summer are just beginning, so keep this speedy recipe in mind in the months to come.  Just add fresh fruit slices (such as mango), a savory side dish like creamed or wilted spinach, and a big chilled pitcher of orange juice, and you've got all the makings of a brunch to share with friends and family.

Ingredients:
  • 1 teaspoon canola oil
  • 1 teaspoon chili powder
  • 1/2 teaspoon ground cumin
  • 12 ounces crumbled lite firm tofu
  • 1/4 cup shredded Daiya cheddar
  • 2 tablespoons minced fresh cilantro
  • 1/8 teaspoon salt
  • 4 (8-inch) flour tortillas
  • 2 cups baby spinach leaves
  • 1 cup bottled salsa
1. Heat the canola oil in a medium skillet over medium-high heat.  Add the chili powder and cumin, and cook for 10 seconds.  Add the tofu; cook for 1 and 1/2 minutes, stirring frequently.  Add the cheddar, cilantro, and salt.  Remove from heat.

2. Meanwhile, warm the tortillas according to package directions.  Arrange 1/2 cup spinach leaves over each tortilla.  Top each tortilla with about 1/4 cup tofu mixture, and roll up.  Serve the burritos with the salsa.  My favorite is the mild salsa from Amy's (which is certified vegan), but use any kind from mild to spicy.


Note: if you're feeding a large crowd, this recipe can double in a pinch - just use a large skillet instead of a medium one.

Nutrition Info:
4 servings (1 burrito, 1/4 cup salsa), Calories 209 

Tasting Notes:
Absolutely delicious.  So savory, with wonderful layers to each bite - the spice of the salsa on top, the soft warm tortilla, the savory tofu mixture and the crisp spinach leaves.  I considered for a moment that these might be even better with wilted spinach, but on second thought I like the fresh texture and taste that the fresh spinach provided.  The only tweak I would make is to increase the spices in the tofu mixture, and maybe some nutritional yeast, for a more "eggy" flavor, but these merit a 5 nonetheless.

Rating:
5

Friday, May 27, 2011

Shrimp Pad Thai

I was intrigued by this recipe, calling as it does for ketchup as the base of a pad thai sauce (which typically includes ingredients such as tamarind paste and chile sauce).  But it sounded like fun, so I gave it a go.  For the ketchup, I recommend either Organicville (sweetened with agave nectar) or Annie's Naturals (with organic cane sugar), both certified vegan.  If you can't find wide rice noodles, try linguine instead.  For the rest of the recipe, read on.

Ingredients:
  • 8 ounces wide rice stick noodles
  • 1/4 cup ketchup
  • 2 tablespoons vegan sugar
  • 3 tablespoons vegan fish sauce*
  • 1/2 teaspoon crushed red pepper
  • 2 tablespoons canola oil, divided
  • 1 pound Vegetarian Plus shrimp, thawed
  • 8 ounces crumbled lite firm tofu
  • 1/8 teaspoon ground turmeric (for color)
  • 1 cup fresh bean sprouts
  • 3/4 cup (1-inch) sliced green onions
  • 1 teaspoon bottled minced garlic
  • 2 tablespoons chopped unsalted dry-roasted peanuts**
1. Place the rice noodles in a large bowl and cover with hot water; let stand about 12 minutes, until tender; drain.

2. Meanwhile, combine the ketchup, sugar, fish sauce, and crushed red pepper in a bowl; set aside.


3. Heat 2 teaspoons of the canola oil in a large skillet over medium-high heat.  Add the shrimp and saute for 2 minutes. Remove the shrimp from the pan.

4. Heat the remaining 4 teaspoons canola oil in the skillet.  Add the tofu to the skillet, along with the turmeric, and cook for about 30 seconds - the mixture should look like scrambled eggs.  Add the sprouts, green onions, and garlic; cook for 1 minute.  Add the rice noodles, ketchup mixture, and shrimp; cook for a final 3 minutes.  Sprinkle with the peanuts.

To round out the meal, I tossed together a quick spicy cucumber salad: peel, seed, and thinly slice 2 cups of cucumber.  Combine the cucumber in a bowl with 1 cup julienne-cut red bell pepper and 1/4 cup thinly sliced red onion.  In a bowl, whisk together 1 tablespoon vegan sugar, 2 tablespoons fresh-squeezed lime juice, 1 tablespoon vegan fish sauce, and 1/2 teaspoon crushed red pepper.  Pour the dressing over the cucumber mixture and toss to combine. 


Finally, after all those flavors on the tongue, I highly recommend a small dish of lemon sorbet for dessert - try the lemon zest sorbet from Ciao Bella.


*For the full run down on your options for vegan fish sauce, plus my favorite home-made version, see post for Lion's Heat Meatballs in Spicy Coconut Sauce from February 2011.

**Vegan buyer beware: Something so simple as dry-roasted peanuts certainly shouldn't pose a threat to the conscientious vegan, right?  Alas, wrong.  Many versions have a whole host of ingredients that aren't vegan.  To my shock, the Planter's dry-roasted peanuts contain gelatin.  Other brands have sneaky things like dextrose (often not vegan in origin) and MSG (vegan, but not to my liking).  I actually did track down dry-roasted peanuts from Whole Foods which contained nothing other than peanuts and salt (phew!) but since this recipe called for unsalted peanuts, that went back on the shelf too.


Luckily, a savvy vegan can quickly dry-roast her own peanuts at home.  Buy raw shelled peanuts and arrange in a single layer on a baking sheet.  Bake at 350 degrees for about 10 minutes, stirring occasionally.  They should be just starting to brown when you remove them from the oven, but be careful not to cook too long, as they will continue to cook once out of the oven.  Spread on paper towels to cool.  Use 2 tablespoons for this recipe, and set aside the rest for snacking later in the week.

Nutrition Info:
6 servings (1 and 1/2 cups), Calories 343 

Tasting Notes:
Forgive me purists, but I quite enjoyed this unorthodox version of pad thai.  If anything, I thought all the components of the sauce - ketchup included - could have been stronger.  The dish also certainly needed a little more crushed red pepper, or perhaps Thai chile sauce to perk up the heat.  I also might season the tofu, but liked the texture that it added.  The crunch from the peanuts was delicious, so don't leave them out.

Rating:
3.5

Thursday, May 26, 2011

Tomatillo Salsa

As promised, here is a salsa to try alongside the corn cakes I made last night (see post for Arepas).  I have to start out by saying what an absolute delight this recipe is to make.  The ingredients and preparation filled my kitchen with the sounds and smells of a South American kitchen, and transported me out of Manhattan for a short while.

Ingredients:
  • 1 teaspoon cumin seeds
  • 2 jalapeno peppers
  • 1 pound tomatillos
  • 2 tablespoons chopped sweet onion (such as Vidalia)
  • 1/4 cup chopped fresh cilantro
  • 1 tablespoon fresh-squeezed lime juice
  • 3/4 teaspoon sea salt
1. Place the cumin seeds in a cast-iron skillet over medium heat and cook for 2 minutes, until toasted - what a wonderfully fragrant smell!  Transfer to a spice grinder and process until finely ground; set aside.  This was actually the first time I used my spice grinder (a present from last Christmas) and I was so pleased with the results.


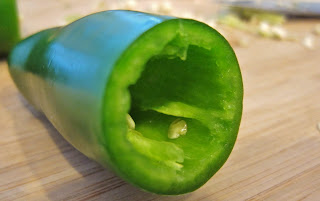
2. Cut 1/4 inch off the stems ends of the jalapenos, and discard the stem ends.  Using a paring knife, remove the seeds and membranes from the jalapenos, being sure to leave the jalapenos intact - this step isn't nearly as hard as it sounds, if you use a gentle turning and scooping motion.


3. Remove the husks from the tomatillos.  Return the cast-iron skillet to medium heat, and add the jalapenos and tomatillos; cook for 15 minutes, turning frequently - by the end, the jalapenos and tomatillos will be speckled with black marks.


4. Transfer the jalapenos and tomatillos to a food processor and process until smooth.  Add the sweet onion and pulse about 5 times to blend.  Spoon the tomatillo mixture into a bowl.  Stir in the toasted cumin, cilantro, lime juice, and salt.


If you haven't made arepas at home, fret not.  This salsa is equally delicious with store-bought tortilla chips, or as part of a black bean burrito, quesadilla, or soft taco supper. I found the salsa particularly enjoyable topping a quesadilla made with the rice vegan cheddar slices from Galaxy Foods.

Nutrition Info:
8 servings (1/4 cup), Calories 22 

Tasting Notes:
A little on the watery side, but wonderful fresh flavor nonetheless, particularly from the fresh-squeezed lime juice and the warm toasty notes of the cumin.  There was the exact right amount of heat from the jalapenos for my taste, and nice green flavor from the tomatillos. 

Rating:
3.5

Wednesday, May 25, 2011

Arepas

Earlier this month, I paired an Indian flatbread (dosas) with a complimentary condiment - in that case chutney.  Tonight, I decided to try a similar pairing from a different part of the world - South America.  Arepas are a thick corn pancake often eaten in Venezuela and Chile, where they are served with numerous toppings or fillings (two arepas take the place of sandwich bread).  Tomorrow night, I intend to make a salsa to pair with this recipe, but for the bread itself, read on.

Ingredients:
  • 2 and 1/4 cups water
  • 1 teaspoon sea salt
  • 5 teaspoons olive oil
  • 2 cups masa harina*
  • Cooking spray
1. Combine the water, salt, and olive oil in a saucepan.  Bring to a boil.  Place the masa harina in a large bowl, and pour in the boiling water mixture; stir with a wooden spoon to combine.  Cover and let stand for 15 minutes.

2. Divide the dough into 12 equal portions (use caution, because the dough will still be a bit hot at this point).  With moist hands, and working with 1 portion at a time, roll the dough into a ball, then shape into a 1/2-inch thick patty.  Repeat with the remaining dough.  Coat 1 side of each patty with cooking spray.

3. Heat a large cast-iron skillet over medium heat.  Add 4 patties, cooking spray sides down.  Flatten with a spatula to about 1/4-inch thick.  Cook for 5 minutes on each side - the arepas will be crispy and speckled brown by the end.  Repeat in 2 more batches, with the remaining patties.


Tonight, I served the arepas with a pinto bean filling, but feel free to get creative. Other great options include guacamole, shredded vegan cheese, strips of vegan chicken or vegan ground beef crumbles, or sun-dried tomatoes and grilled eggplant.

*I should note that these corn cakes are not true arepas, in the sense that I used masa harina (corn flour) rather than arepa flour.  As I understand it, the difference between the two is that the former is treated with lime and the latter is not.  Although on the one hand this means that my arepas have a more tortilla-ish taste than they should, it also means they have a higher nutrient value, since the lime increases the amounts of niacin and calcium absorbed by the body.

Nutrition Info:
12 servings (1 corn cake), Calories 90

Tasting Notes:
Think of a cross between a thin cornbread and a thick corn tortilla, and you pretty much have this recipe.  Nice and crisp on the outside, with a soft, chewy interior.  A tiny bit bland on its own, but then, that's not how the arepas are meant to be eaten.  As the "bread" for whatever sandwich filling you can think of, these were quite good.  A great, simple recipe to have in your tool kit.


Update: I served the arepas with my Tomatillo Salsa the following night, and loved the combination - both recipes tasted better than when solo.  Add a cold pilsner-style beer (such as Presidente, Landshark, or Pacifico, all vegan), and you have the perfect tasty snack.

Rating:
3

Tuesday, May 24, 2011

Strawberry-Blueberry Compote in Red Wine Syrup

I'm a proponent of a glass or two of wine in the evening - not only is it delicious and relaxing at the end of the day, but red wine in small quantities has been shown to reduce risk of heart disease, thanks to the antioxidant resveratrol.  For a great way to incorporate a little wine into your diet, try this easy dessert - a red wine sauce is infused with spices before becoming the base of fruit compote. 

Ingredients:
  • 1 cup vegan dry red wine*
  • 1/4 cup vegan sugar
  • 1/2 teaspoon black peppercorns
  • 2 (2 and 1/2-inch) orange rind strips
  • 1 cinnamon stick
  • 1 bay leaf
  • 4 cups sliced strawberries
  • 1 cup blueberries
1. Combine the wine, sugar, peppercorns, orange rind, cinnamon stick, and bay leaf in a saucepan.  (For best results, use a saucepan that is non-aluminum, or the metal will react with the wine and impart a metallic taste to your final product).  Bring to a boil, then reduce heat and simmer, uncovered, for about 20 minutes - the liquid should be reduced to 1/2 cup.

2. Drain the wine mixture through a colander over a bowl and discard the solids.  Add the strawberries and blueberries, tossing to coat.  Serve this compote while still warm, or chill for up to 2 hours.  Chilled any longer than that, and the fruit starts to macerate, so it's not as good. The compote is delicious on its own, but is particularly great as a sauce, whether over your favorite vanilla non-dairy ice cream, atop a slice of vegan cake, or with almond biscotti.  Vegan biscotti are available online from Sweet & Sara, but I actually had fun making my own, adapting this recipe only slightly with egg replacer instead of eggs.


*You've probably noticed that whenever I call for wine in a recipe, I make sure to specify vegan wine. As you may already know, many brands of wine are filtered through animal byproducts (such as isinglass from fish bladders, or egg whites).  It used to be almost impossible to know which wines used what as a filter, but luckily there are now online (and in-store) wine shops that label wines specifically as vegan.  Another trick is to choose a wine that specifies it is unfined or unfiltered on the label (see photo below, where the label says in French "sans filtration").  I've noticed that many organic wines are also unfiltered wines, which makes me happy all around. 


Still stuck on where to get your vegan wine?  Try these links:
www.theorganicwinecompany.com
www.fitzpatrickwinery.com 

Nutrition Info:
8 servings (1/2 cup), Calories 61 

Tasting Notes:
Really nice, warm notes of cinnamon and orange in the wine syrup.  The compote was tasty - refreshing and simple - although I think I would simmer the strawberries and blueberries next time, rather than tossing them in the red wine raw.  I'd even omit the fruit all together, and turn this into a batch of mulled wine in the winter!

Rating:
3.5

Monday, May 23, 2011

Spring Giardiniera

Giardiniera is a dish of Italian origin; while it literally means "gardener," in culinary terms it refers to vegetables pickled in vinegar, which are often served either as a condiment or as part of an antipasto platter.  Because it's made ahead of time, giardiniera is great for company (perhaps for the upcoming Memorial Day weekend).  Serve as a side dish with dinner, or just leave a platter out for guests to snack on with late afternoon cocktails.

Ingredients:
  • 1 and 1/2 cups cider vinegar
  • 1/2 cup water
  • 2 tablespoons vegan sugar
  • 1 tablespoon salt
  • 1 teaspoon black peppercorns
  • 1/2 teaspoon mustard seeds
  • 1/2 teaspoon dried dill
  • 2 bay leaves
  • 2 cups small cauliflower florets
  • 2 cups (3-inch) diagonally cut asparagus
  • 1 and 1/2 cups trimmed green beans
  • 1 cup (1/4-inch) diagonally cut carrot
  • 1 cup red bell pepper strips
  • 6 trimmed green onion bottoms
  • 4 halved garlic cloves
1. Combine the cider vinegar, water, sugar, salt, peppercorns, mustard seed, dill, and bay leaves in a saucepan.  Bring to a boil, then reduce heat and simmer for 3 minutes.


2. Place all of the vegetables in a large zip-top plastic bag.  Carefully pour the vinegar mixture over the vegetables.


3. Seal the bag and refrigerate for at least 8 hours and up to overnight, turning occasionally.  Remove the vegetables from the bag with a slotted spoon before serving, and discard the vinegar mixture.

Nutrition Info:
6 servings (1 cup), Calories 57 

Tasting Notes:
Crisp and crunchy, which made for a nice snack.  However, because the vinegar taste is strong, I preferred the giardiniera as a side dish - a dinner of grilled Match pork with a hoisin sauce and creamy mashed potatoes with rosemary helped to cut the bite of the vinegar in the vegetables.  Don't be alarmed by the full tablespoon of salt called for - even though it sounds like a lot, I actually found this version to be a lot less salty than commercial versions. Finally, next time I wouldn't use green onions or garlic - since they are never cooked, only pickled, they had way too much of a bite.

Rating:
3

Sunday, May 22, 2011

Apple and Blackberry Crumble

This recipe is a fairly classic crumble - a dessert of British origin that consists of any sort of fruit topped with a crumbly mixture of flour, (vegan) butter, and sugar.  Although I used apples and blackberries tonight, feel free to vary the fruit in this dessert all summer long - rhubarb, peaches, and plums are other great options.

Ingredients:
  • 6 cups peeled and sliced Rome apple
  • 1/3 cup packed vegan brown sugar
  • 1 tablespoon lemon juice
  • 1 tablespoon water
  • 1 cup blackberries
  • 1 and 1/4 cups all-purpose flour
  • 6 tablespoons vegan butter
  • 1/2 cup vegan sugar
  • 1/4 teaspoon ground ginger
1. Combine the apples, brown sugar, lemon juice, and water in a saucepan.  Cook over medium heat for 10 minutes - the apples should be soft by the end.  Spoon into an 8-inch pie plate and top with the blackberries.


2. Lightly spoon the flour into dry measuring cups and level with a knife; place the flour in a medium bowl.  Cut the butter into small pieces and cut into the flour with a pastry blender until the mixture looks like coarse meal.  Add the sugar and ground ginger, tossing to combine.

3. Sprinkle the flour mixture over the fruit, then bake at 350 degrees for 30 minutes.

4. Remove the pie plate from the oven to preheat the broiler.  Return the pie plate to the oven and broil for 1 minute, until the crumble topping is lightly browned.


You can serve this on its own, or with a scoop of non-dairy ice cream or a spoonful of hot custard - check out the vegan custard from Just Wholefoods (a British company, but available here in the states from veganessentials.com).  It's a snap to prepare at home, and delicious warm over this dessert.


Nutrition Info:
8 servings (1 portion), Calories 287 

Tasting Notes:
I've only ever made a few crumbles but this was by far the tastiest - the apple filling was perfectly tender, and I loved the way that the topping practically condensed to form a soft pie crust with each bite.  Which leads to my next point, which is that crumble is the perfect easy dessert when you want all the taste of a pie, but don't want to take the time to make and roll out an actual pie dough.  I highly recommend that scoop of ice cream on top, since the contrast between the warm crumble and the cold ice cream was "restaurant-worthy."

Rating:
5

Saturday, May 21, 2011

Shrimp and Kiwi Salad

Here's a quick dinner salad for two.  All you need to round out the meal are French bread rolls.

Ingredients:
  • 1 tablespoon olive oil, divided
  • 12 Vegetarian Plus shrimp, thawed
  • 1 tablespoon chopped green onions
  • 1 tablespoon chopped fresh cilantro
  • 1 tablespoon rice vinegar
  • 1 tablespoon fresh-squeezed lime juice
  • 1 teaspoon grated lime rind
  • 1/8 teaspoon salt
  • 1/8 teaspoon crushed red pepper
  • 1/8 teaspoon black pepper
  • 2 cups torn red leaf lettuce
  • 1 cup peeled and cubed kiwifruit
1. Heat 1 teaspoon olive oil in a large skillet over medium-high heat.  Add the shrimp and saute for 4 minutes; set aside.

2. Combine the remaining 2 teaspoons olive oil in a bowl with the green onions, cilantro, rice vinegar, lime juice, lime rind, salt, red pepper, and black pepper.  Add the shrimp and toss to coat.

3. Place 1 cup lettuce on each of 2 plates.  Spoon the shrimp mixture evenly over each plate, and top evenly with the kiwi.

Nutrition Info:
2 servings (6 shrimp, 1 cup lettuce, 1/2 cup kiwi), Calories 330

Tasting Notes:
I love vegan shrimp, and I love kiwi, so I thought this salad would be sublime.  Alas, while good, I didn't find it to be anything out of the ordinary.  I think the lettuce was not the best backdrop, might even serve this over rice next time.  Still, a good, quick entree salad to keep in mind in the warm months ahead.

Rating:
3

Thursday, May 19, 2011

Arugula, Fig, and Blue Cheese Salad

After several experiments in baking lately, tonight I wanted something simple and healthy for dinner.  This quick salad fit the bill, and gave me an excuse to enjoy Sunergia's soy bleu cheese, which may be my weakest indulgence these days.  The blue cheese pairs beautifully with the figs.

Ingredients:
  • 2 cups torn red leaf lettuce
  • 1 and 1/4 cups quartered fresh figs
  • 1 cup trimmed arugula
  • 2 tablespoons fresh-squeezed lemon juice
  • 2 teaspoons olive oil
  • 1/4 teaspoon salt
  • 1/4 teaspoon black pepper
  • 3 tablespoons crumbled vegan blue cheese (such as Sunergia)
1. Combine the red leaf lettuce, figs, and arugula in a bowl.


2. In a small bowl, whisk together the lemon juice, olive oil, salt, and black pepper.  Pour over the lettuce mixture, tossing gently to combine.  Sprinkle with the blue cheese.

Note: although you can serve 4 people with appetizer portions of this salad, you can also enjoy the whole recipe as a main dish salad.

Nutrition Info:
4 servings (1 cup), Calories 74 

Tasting Notes:
This salad tastes super elegant, considering how little time it takes.  Everything was wonderful, from the sweet plump figs, to the creamy blue cheese, to the peppery arugula, except the dressing which was a little too tart for my taste.  Next time, I will decrease the amount of lemon juice.  Aside from that, this is a great, quick salad.  Keep it in mind for guests, since - as I mentioned - it appears super elegant but takes no time at all.

Rating:
3.5

Vegan Update:
Vegan cheeses continue to get better all the time - I'm continually amazed when I think back on the difference between 2002 (when I went from vegetarian to vegan) and now. If you're looking for other great ways to enjoy vegan cheese, here are a couple suggestions.

Serve Sunergia's soy bleu with sliced pears for a dessert cheese course.


Pair Vegan Gourmet's cheddar with apple wedges for an afternoon snack.


Wednesday, May 18, 2011

Hot Chocolate Souffle

I've always thought that the holy grail of vegan cooking is to make a souffle rise (and from chatter on other vegan websites, it looks like I'm not alone).  I can't resist trying though, and my results tonight were still not perfect, but were close enough to produce a yummy dessert.  I find that the trick is to use beaten Ener-G egg replacer in place of egg whites, and to give that egg replacer a boost from flour and baking powder.

Ingredients:
  • Cooking spray
  • 1 tablespoon vegan sugar
  • 3/4 cup plain non-dairy milk
  • 1/4 cup vegan sugar
  • 4 teaspoons cornstarch
  • 1 teaspoon instant coffee granules
  • 1/8 teaspoon salt
  • 1 Ener-G egg yolk
  • 1 teaspoon vanilla extract
  • 4 ounces coarsely chopped dark chocolate
  • 4 Ener-G eggs
  • 3 tablespoons vegan brown sugar
  • 2 tablespoons all-purpose flour
  • 1 and 1/2 teaspoons baking powder
  • 3/4 cup coffee non-dairy ice cream*
1. Coat a 1 quart souffle dish with cooking spray and sprinkle with 1 tablespoon sugar; set aside.

2. Combine the milk, 1/4 cup sugar, cornstarch, instant coffee, and salt in a small saucepan, stirring with a whisk until blended - the mixture smelled like a coffee milkshake at this point - yum!  Bring to a boil over medium heat, then continue to cook for 1 minute, stirring constantly, until thick.  Remove from heat.

3. Gradually add the hot milk mixture to the Ener-G egg yolk (1 and 1/2 teaspoons powder whisked into 1 tablespoon warm water), stirring constantly with a whisk.  Return the mixture to the saucepan and cook over medium heat for about 2 minutes, until thick, stirring constantly.  Remove from heat and add the vanilla extract and chocolate, stirring until the chocolate melts.  I found it best to let this chocolate mixture cool to room temperature, so as to avoid deflating the beaten Ener-G eggs in the next step.

Note: choose a dark chocolate that's about 80% cacao for this recipe, for a bittersweet flavor.

4. Now comes the fun part.  Make 4 Ener-G eggs in a large bowl.  Beat with a hand mixer for 12 minutes - yes 12 - until the mixture is thick like egg whites.  At about the 6 minute mark, begin adding the brown sugar, 1 tablespoon at a time, continuing to beat after each addition.


I'm convinced that using Ener-G in this way will be the key to vegan souffles, and am surprised that more people don't experiment with it.  I've also made Belgian waffles and individual mini souffles rise beautifully with this 12-minute-trick.

5. In a bowl, stir together the flour and baking powder.  Stir in to the chocolate mixture.

6. Gently stir one-fourth of the beaten Ener-G mixture into the chocolate mixture; fold in the remaining beaten Ener-G mixture.  Spoon into the prepared souffle dish.

6. Bake at 375 degrees for about 35 minutes - it will be puffed up by the end, although won't quite spill over the rim of the souffle dish.  Just like a non-vegan souffle, the dessert needs to be served immediately, because it will deflate very soon once out of the oven.  Serve with the coffee ice cream on top - the ice cream will melt to make a quick sauce. 


*Coffee ice cream was my favorite flavor in my lacto-ovo vegetarian days, but I have had the hardest time finding companies that make a vegan version.  Chocolate, vanilla, mint chip, pomegranate - you name it, but nobody is churning out coffee-flavored non-dairy ice cream.  Just recently I discovered Tempt, a frozen dessert made from hemp milk, which makes a coffee biscotti flavor.  And luckily I found it just in time to make it part of tonight's dessert.

Nutrition Info:
6 servings (about 2/3 cup souffle, 2 tablespoons ice cream), Calories 253 

Tasting Notes:
Delicious.  Like a cross between a rich chocolate pudding and a brownie in the middle with a top and edges that were beautifully crisped and puffed.  Next time, to make it even better, I would play up the coffee factor by increasing the amount of instant coffee granules in the batter, and serving extra coffee ice cream on top.

Rating:
4

Sunday, May 15, 2011

Mango Salsa

Tonight's post is just a quick fresh salsa.  This delicious salsa works equally well with baked tortilla chips as it does with vegan chicken and rice for dinner.

Ingredients:
  • 3 cups peeled and cubed ripe mango
  • 1 cup chopped green onions
  • 1/2 cup chopped fresh cilantro
  • 1/3 cup fresh-squeezed lime juice
  • 3 tablespoons seeded and finely chopped jalapeno pepper
  • 1 teaspoon vegan sugar
  • 1/2 teaspoon salt
1. Combine all of the ingredients in a bowl, and toss well to combine.  Cover and chill until ready to serve.


Note: on a more adventurous note, the salsa is also delicious alongside breaded vegan fish fillets, a new product available on vegan websites (veganessentials.com and veganstore.com) from a brand called Sophie's Kitchen.  The company also makes vegan calamari, but I'm not sure I'm ready to go down that route yet. 

Nutrition Info:
6 servings (1/2 cup), Calories 68 

Tasting Notes:
Super fresh, wonderfully sweet mango.  I love recipes like this that require almost no embellishment, and let the fresh produce stand out on its own.  Keep this salsa in mind all summer long, as it's sure to become a warm-weather standard.

Rating:
3.5

Saturday, May 14, 2011

Fig and Pistachio Chutney

As promised, here's a chutney to accompany the Indian flatbread I made - see post for Dosas (Indian Rice and Lentil Pancakes).  My apologies that posts have been a little scrambled over the past couple of days while Blogger sorted out some technical issues!

Ingredients:
  • 3 cups water
  • 1 and 3/4 cups chopped dried figs
  • 1/3 cup cider vinegar
  • 2 tablespoons peeled and chopped fresh ginger
  • 3 tablespoons agave nectar
  • 1/4 teaspoon salt
  • 1/4 teaspoon fennel seeds
  • 1/4 teaspoon coriander seeds
  • 1/4 teaspoon crushed red pepper
  • 1/4 teaspoon black peppercorns
  • 2 (2-inch) orange rind strips
  • 1/4 cup chopped unsalted pistachios
1. Combine all the ingredients except the pistachios in a saucepan.  Bring to a simmer over medium heat, then cover, reduce heat, and simmer for 30 minutes.  Uncover and continue to simmer until the liquid becomes syrupy, stirring occasionally - it will take anywhere from 30 minutes to 1 hour for the chutney to reach this stage. Do keep in mind that the chutney will continue to thicken slightly as it cools, so you don't want to make it too thick during cooking.


2. Remove from heat and discard the orange rind strips; cool.  Stir in the pistachios.  As mentioned, you can serve alongside Indian flatbread such as dosa or uttapam.  If you don't want to make two recipes, however, this chutney is also great as part of an appetizer platter - try cubed vegan cheeses, rolled slices of Lightlife vegan deli meats, and little cornichons pickles. 


Nutrition Info:
6 servings (1/4 cup), Calories 165 

Tasting Notes:
Much as with the dosas I made, I found that the chutney was fine on its own - quite fig-y - but was even better when served as a condiment, and in conjunction with the dosas.  A real nice crunch from the pistachios.  The spice flavors were delicious, though you could easily increase quantities according to taste, depending how spicy you like things.

Rating:
3.5

Friday, May 13, 2011

Dosas (Indian Rice and Lentil Pancakes)

Dosas, as per the title of this post, are an Indian flatbread made of rice and lentil batter, which is left to ferment overnight before cooking.  I've been looking forward to making this recipe for quite some time, since dosas originated in the southern states of India, where my fiance's father's family comes from.  I found skinned split lentils (called urad dal) at my favorite Indian grocer in the East Village, and could finally experiment.  Regular lentils will not substitute in this recipe, so do make sure to track down urad dal.  Be aware that this isn't a dish you can make last minute; you must start the recipe about 24 hours before you intend to serve it. 

Ingredients:
  • 7 and 1/4 cups bottled water, divided
  • 1 and 1/2 cups white basmati rice
  • 1/2 cup urad dal
  • 1 tablespoon vegan sugar
  • 2 teaspoons sea salt
  • 4 teaspoons canola oil, divided
1. Combine 6 cups of the bottled water with the rice and urad dal in a large bowl.  Cover and let stand for 8 hours.  Although normally I advocate using tap water, bottled water is essential for this recipe.  It ensures that the lentils will soften as they stand, since the hard minerals in some tap water can prevent them from doing so.  

2. Drain and rinse the rice mixture.  Place the rice mixture in a food processor, along with an additional 1 and 1/4 cups bottled water and the sugar; process for about 1 minute, until smooth.


3. Spoon the batter into a clean bowl; cover and let stand some place warm and free from drafts for at least 12 hours, and up to overnight - a closed, unheated oven is a great place to let the batter sit.  Stir in the salt at the end. 

4. Heat 1/2 teaspoon canola oil in a medium cast-iron skillet or griddle over medium heat.  Spoon 1/3 cup of the batter into the pan.  Flip the pancake after about 1 minute - the top should be covered with bubbles and the edges should look cooked - and cook for an additional minute on the other side.  Remove the pancake from the skillet, and repeat with the remaining oil and batter (you'll have enough for 8 pancakes). 


You can serve these pancakes with any Indian entree, or bottled Indian pickle or chutney.  Tonight, I went with the store-bought vegetable korma from Amy's brand of frozen foods.  The dosas work wonderfully as a wrap around the filling of your choice. 


Note: I have a few tips that weren't included in the recipe instructions, which I learned by trial and error making these pancakes.  First, it's useful to spread the canola oil with a paper towel so that it covers the entire surface over which you will pour the pancake batter.  Not doing so causes the batter to stick or burn.  Secondly, don't let the heat go past medium; again, doing so will mean burnt pancakes.  Finally, having made the recipe according to directions, I was a little surprised to realize that this recipe is really for uttapam, and not dosa - although made of the same batter, uttapam are thick like a pancake, whereas dosa should be thin like a crepe.  If you want to cook the batter thin like true dosas, you might check out this website.

Nutrition Info:
8 servings (1 pancake), Calories 197

Tasting Notes:
On their own, the dosa taste like a thick, soft rice cake - a little salty, but a little bland, so nothing too special.  But as a vehicle on which to scoop up an Indian entree, or to serve with a yummy chutney, they quickly transform from mediocre to delicious.  I kept the rating below for just the dosa, but that rating quickly climbs higher the instant the dosa has a topping or stuffing.  Tomorrow night, to follow up on the idea, I intend to give you a chutney recipe to serve alongside these pancakes. 


Update: as promised, here's a photo of the chutney and dosa together - a great combination.  See post for Fig and Pistachio Chutney for full details.. 

Rating:
3.5