Tuesday, July 31, 2012

Orange Mandarin Chicken

When I was growing up, dessert with my dad was sometimes as simple as a can of mandarin oranges, and I have such fond memories of relishing the sweet little oranges with him after dinner.  So the instant I discovered that Whole Foods now makes organic canned mandarin oranges (in pear juice, instead of a heavy syrup), I had to give this recipe a try.

Ingredients:
  • 2 teaspoons dark sesame oil
  • 4 Gardein Tuscan chicken breasts (without sauce)
  • 1/2 teaspoon salt
  • 1/4 teaspoon black pepper
  • 1 (11-ounce) can mandarin oranges in pear juice
  • 1/2 cup chopped green onions
  • 1 tablespoon finely chopped and seeded jalapeno pepper
  • 1 teaspoon bottled minced garlic
  • 1/2 cup vegan chicken broth (such as Imagine)
  • 1 tablespoon low-sodium soy sauce
  • 2 teaspoons cornstarch
1. Heat the sesame oil in a large skillet over medium-high heat. Sprinkle the chicken evenly with the salt and black pepper, and add to the pan; cook for 4 minutes on each side.

2. Meanwhile, drain the oranges over a bowl, reserving 2 tablespoons liquid; discard the remaining liquid.


3. Add the oranges, reserved liquid, green onions, jalapeno, and minced garlic to the pan.  Reduce heat and simmer for 2 minutes.

4. Whisk together the broth, soy sauce, and cornstarch.  Add to the pan and bring to a boil; continue to cook for 1 minute, until slightly thickened.


You can serve the chicken alone, but I highly recommend a bed of Asian noodles whether somen:


udon:


or soba noodles:


Any of them work well here.  Add steamed snow peas on the side to round out the meal.

Nutrition Info:
4 servings (1 chicken breast, 6 tablespoons sauce), Calories 212 

Tasting Notes:
Overall, a fun dish, if you like mandarin oranges as much as I do.  The taste was surprisingly blander than I expected, despite nice heat from the jalapeno.  I would increase the soy sauce and decrease the green onions, and then I think the overall flavor would become a winner.  I also would chop the chicken into bite sized pieces next time during cooking, so that the dish could be ladled more easily over noodles - because you will definitely want noodles to soak up the sauce, and enjoy the flavor to the fullest.

Rating:
3.5

Monday, July 30, 2012

Orzo Salad

If you're looking for a variation on a summer pasta salad, try this version made with orzo instead of more standard macaroni or penne.  Nearly as short as grains of rice, small orzo pasta works great in cold pasta salads.

Ingredients:
  • 3 cups hot cooked orzo
  • 1 cup frozen green peas, thawed
  • 3/4 cup crumbled vegan feta (such as Veg Cuisine)
  • 1/4 cup chopped fresh parsley
  • 3 tablespoons balsamic vinegar
  • 2 tablespoons olive oil
  • 1/2 teaspoon salt
  • 1/4 teaspoon black pepper
  • 1 minced garlic clove
1. Prepare the orzo according to package directions (start with about 1 and 1/2 cups uncooked pasta to yield the correct amount). Drain.

2. Combine the hot orzo in a bowl with all the remaining ingredients, tossing well.  Cover and chill for 1 hour, at which point you can serve the salad chilled, or bring back to room temperature.


This salad pairs great with quintessential summer foods - try serving with vegan cold cuts (I love Lightlife's deli ham), corn on the cob, and Gardein's crispy chicken fingers, for a backyard vegan cookout or picnic.


Nutrition Info:
8 servings (1/2 cup), Calories 213 

Tasting Notes:
Aesthetically, I was a little disappointed, since the balsamic vinegar tinged the pasta a pale gray.  However, the taste of the balsamic paired quite nicely with the orzo, peas, and feta.  If you want to make the pasta more summery, I recommend basil or perhaps cherry tomatoes stirred in, but it is already good without any changes.  

Rating:
3.5

Sunday, July 29, 2012

Green Bean and Cherry Tomato Salad

Here's a great side salad for your next veggie burger night - green beans and summer-fresh tomatoes tossed in a simple vinaigrette.  As with my recipe for Green Beans and Potatoes Tossed with Pesto or Grilled Tomato Sandwiches, this is the kind of recipe that's worth a trip to the farmers' market, for the absolute best produce.

Ingredients:
  • 1 and 1/4 pounds trimmed green beans
  • 1 and 1/4 pounds quartered cherry tomatoes
  • 1 teaspoon chopped fresh oregano
  • 1 tablespoon minced shallots
  • 2 tablespoons red wine vinegar
  • 2 and 1/2 teaspoons olive oil
  • 1/2 teaspoon salt
  • 1/4 teaspoon black pepper
1. Cook the green beans in boiling water for 7 minutes, until tender.  Drain, and combine the beans in a large bowl with the cherry tomatoes and oregano.

Note: you can use all red cherry tomatoes, but with so many other varieties at farmers' market stalls, it's fun to go for a multi-colored blend.  Add yellow, orange, or heirloom cherry tomatoes to the mix too.


2. Whisk together the shallots and red wine vinegar; let stand for 10 minutes.  Add the olive oil, salt, and black pepper, and pour over the green bean mixture.  Toss well.

I thought this salad paired perfectly with veggie burgers.


Nutrition Info:
8 servings (1 cup), Calories 51 

Tasting Notes:
The oregano lifted this green bean salad above the rest.  Add to that the fresh tomatoes and green beans that both tasted just-picked from the farm, and lovely notes of vinegar and shallot to each bite, and there was very little to complain about.  An easy summer side.

Rating:
3.5

Friday, July 27, 2012

Herbed Pork with Sauteed Wild Mushrooms

Make this super-fast dinner with the help of Match pork. You'll have to excuse the ingredient item listed as "steak seasoning."  Perhaps we could give it a nickname, like "Match seasoning," but steak seasoning is the label under which it is sold.  Essentially a blend of cracked black pepper, crushed red pepper, garlic, and salt, you could also mix up your own blend at home. Or, just use all cracked black pepper instead, in which case I recommend decreasing the amount to 1 teaspoon.

Ingredients:
  • 1 teaspoon canola oil
  • Cooking spray
  • 3 cups sliced shiitake mushroom caps
  • 1 and 1/2 teaspoons steak seasoning
  • 1 teaspoon dried thyme
  • 1 pound Match pork, thawed
  • 1 cup vegan chicken broth (such as Imagine)
  • 2 teaspoons cornstarch
1. Heat the canola oil in a large skillet coated with cooking spray over medium-high heat.  Add the shiitake mushrooms and saute for 3 minutes.  Remove the mushrooms from the pan.


2. Divide the pork into 4 portions, shaping each into a 1/4-inch thick patty.  Rub the steak seasoning and thyme evenly over the pork.  Add to the pan and cook for 3 minutes on each side.


3. Meanwhile, whisk together the broth and cornstarch in a bowl.  Add to the skillet, along with the mushrooms, and bring to a boil; cook for a final minute, until the broth is slightly thickened.

Because the sauce is somewhat thin, I recommend serving over a bed of something to soak up all the extra broth. One option is soft polenta sprinkled with vegan Parmesan sprinkles.


Or try steamed brown rice:


Nutrition Info:
4 servings (1 pork piece, about 1/3 cup sauce), Calories 181 

Tasting Notes:
The spice rub was great - full of black pepper and thyme - but alas I was disappointed by the sauce.  Even thinner and blander than I expected, it definitely needed something more. Soy sauce might add earthy, salty notes that would liven up the dish.  The shiitake mushrooms were good, but also a touch bland.  I might use baked tofu steaks instead of the pork next time and see if the overall effect is better.  But extra points for the spice rub.

Rating:
3

Thursday, July 26, 2012

Grilled Tomato Sandwiches

Buy the freshest field tomatoes you can, and turn them into this simple grilled sandwich; with height-of-summer tomatoes this good, who needs grilled cheese?  Whether from the farmers' markets, a roadside stand, or right from the farm... the fresher the better.  For the sourdough bread, any pre-sliced brand will do, but be sure to read ingredient lists for sneaky items like honey or nonfat milk.  I used the whole wheat sourdough from Vermont Bread CompanyRudi's bread also makes a sourdough that is suitable for vegans.

Ingredients:
  • 12 (3/4-inch thick) slices tomato
  • 1/2 teaspoon salt, divided
  • 12 (1-ounce) slices toasted sourdough bread*
  • Cooking spray
  • 1 tablespoon balsamic vinegar
  • 1/4 teaspoon black pepper
  • 6 tablespoons vegan mayonnaise
  • 1 teaspoon fresh-squeezed lemon juice
  • 1 minced garlic clove
  • 3 cups trimmed arugula
1. Sprinkle 1 side of the tomato slices with 1/8 teaspoon salt.  Place on paper towels, salted sides down, and let stand for 10 minutes.  Sprinkle the other side of the tomatoes with 1/8 teaspoon salt and repeat the procedure.

2. Grill the tomato slices and bread slices on an outdoor grill or indoor grill pan coated with cooking spray for 2 minutes, turning over halfway through.  Remove from the grill, and sprinkle the tomato slices with a final 1/4 teaspoon salt, the balsamic vinegar, and the black pepper.


3. Meanwhile, whisk together the mayonnaise, lemon juice, and garlic in a bowl.  Spread 1 tablespoon mayonnaise mixture over each of 6 toast slices.  Top each of those slices with 2 tomato slices, 1/2 cup arugula, and an additional toast slice.

The sandwiches are best served immediately, while warm, and before the tomato makes the bread soggy.


Perfect for a light supper with a bowl of Amy's alphabet soup:


*Toast the bread slices while the salted tomatoes are standing.  I like toasting under the broiler for just over a minute on each side.

Nutrition Info:
6 servings (1 sandwich), Calories 215 

Tasting Notes:
Exactly as fresh and flavorful as I was imagining and hoping.  The tomatoes became warm and soft on the grill (but not watery, thanks to the stint draining on paper towels), and are a great contrast to the peppery arugula and slight sourness of the sourdough bread.  I would definitely use more mayonnaise mixture next time, as the sandwich was a touch dry.  I also would toss the arugula in just a touch of balsamic vinegar, because the vinegar ran off the tomatoes and the flavor was lost.  I would like to try Rudi's sourdough next time, since it isn't made with whole wheat; the whole wheat sourdough I chose tonight felt a touch too... whole wheaty.

Rating:
3.5

Monday, July 23, 2012

Spicy Soba Noodles with Chicken in Peanut Sauce

There's a company called Macro Vegan, whose products are sold here in New York, which makes all varieties of pad thai, lo mein, peanut noodles, and other Asian noodle dishes - and it goes without saying that all are macro and vegan.  Their products have become one of my greatest indulgences (weaknesses?), since although the ingredients are healthy, the dishes are also high in calories.  This dish recreates the taste at home, but it's just a touch lighter, and if anything, even more flavorful.

Ingredients:
  • 1 peeled carrot
  • 2 cups vegan chicken broth (such as Imagine), divided
  • 1/3 cup creamy peanut butter
  • 1 tablespoon peeled and chopped fresh ginger
  • 1 tablespoon low-sodium soy sauce
  • 2 tablespoons agave nectar
  • 1 teaspoon crushed red pepper
  • 1 minced garlic clove
  • 3 Gardein Tuscan chicken breasts (without sauce)
  • 5 cups cooked soba noodles
  • 6 tablespoons sliced green onions
  • 6 tablespoons chopped, unsalted, dry-roasted peanuts*
1. Shave the carrot lengthwise with a vegetable peeler into thin strips. Place the carrot strips in a large bowl and set aside.


2. In a bowl, whisk together 1/3 cup broth, the peanut butter, ginger, soy sauce, agave, crushed red pepper, and garlic; whisk until smooth.  Be sure to use a bowl with high sides, as you'll need to whisk vigorously to smooth the peanut butter into the broth.

3. Meanwhile, place the chicken pieces in a saucepan, and cover with the remaining 1 and 2/3 cups broth.  Bring to a boil; reduce heat and simmer for 4 minutes.  Remove from heat and let stand for 20 minutes.  Drain, and cut the chicken into 2-inch long pieces.

4. Meanwhile, cook the soba according to package directions.  Start with about 10 ounces uncooked soba (also known as buckwheat noodles) to equal 5 cups cooked.

5. Add the cooked soba, chopped chicken, and peanut sauce to the bowl with the carrot strips, and toss to combine. Sprinkle with the green onions and peanuts. 


I served with steamed broccoli on the side for an additional fresh dose of vegetables.   


*Readers of this blog may remember that last year I had the hardest time finding dry-roasted peanuts other than the Planter's brand which - watch out! - contains gelatin.  So when I spotted this recipe, I decided to plan ahead.  I found a family-run company, nutsonline.com, which sells dry-roasted, unsalted peanuts that are nothing other than... dry-roasted, unsalted peanuts.  No strange spices, and no unnecessary use of gelatin.

Nutrition Info:
6 servings (1 cup), Calories 398 

Tasting Notes:
Super tasty - just the right amount of peanut flavor in the sauce, accentuated by the crunch of the peanuts on top.  The sauce was a little dry (almost sticky), so I'd use more broth next time.  Because I used a low-sodium broth, I might also add a touch of salt.  I thought the spice from 1 teaspoon crushed red pepper was just right, but use as much as 2 teaspoons if you enjoy spicier foods.  Next time, I might stir the broccoli right in to the noodles, to make the dish a bit fresher. 

Rating:
4

Thursday, July 19, 2012

Texas Sheet Cake

The origin of this cake's name is unclear, so I decided to do some culinary sleuthing.  According to the Food Timeline, it could refer to a taste that's as big as Texas, the fact that the cake was popularized by Lady Bird Johnson (who hailed from Texas), or that it can feed a "Texas-sized" crowd.  I tend to like the latter interpretation best, since this is big enough to feed everyone at just about any summer gathering you have planned, whether cookouts or birthday parties.

Ingredients:
For the cake:
  • Cooking spray
  • 2 teaspoons all-purpose flour
  • 2 cups all-purpose flour
  • 2 cups vegan sugar
  • 1 teaspoon baking soda
  • 1 teaspoon ground cinnamon
  • 1/4 teaspoon salt
  • 3/4 cup water
  • 1/2 cup vegan butter
  • 1/4 cup unsweetened cocoa
  • 1/2 cup vegan buttermilk*
  • 1 teaspoon vanilla extract
  • 2 Ener-G eggs
For the icing:
  • 6 tablespoons vegan butter
  • 1/3 cup plain non-dairy milk
  • 1/4 cup unsweetened cocoa
  • 3 cups vegan powdered sugar
  • 1/4 cup chopped and toasted pecans**
  • 2 teaspoons vanilla extract
1. To prepare the cake, coat a 15x10-inch jelly roll pan with cooking spray, and dust evenly with 2 teaspoons flour; set aside.

Note: the jelly roll pan is essential here to make a proper "sheet cake."  In a pinch you could bake in a 13x9-inch baking dish, but you'll need to bake longer than the directions call for below, and you'd have to call it a Texas Baking Dish Cake, which isn't nearly as fun.  Do make sure you're using the proper size jelly roll pan - it's smaller than the 17-inch baking sheets I use for cookie batches.

2. Lightly spoon the remaining 2 cups flour into dry measuring cups and level with a knife.  Combine the flour in the bowl of a stand mixer with the sugar, baking soda, cinnamon, and salt.  Set aside.

3. In a saucepan, combine the water, 1/2 cup butter, and 1/4 cup cocoa.  Bring to a boil, stirring frequently.  (Don't worry about starting with melted butter; it will quickly melt into the water as the mixture heats up).  Once boiling, remove from heat and add to the flour mixture; beat at medium speed until blended.

4. Add the buttermilk, 1 teaspoon vanilla, and Ener-G eggs; beat well.

5. Pour the batter into the prepared pan.  Bake at 375 degrees for 17 minutes - a wooden pick inserted in the center should come out clean.  Transfer to a wire rack.


Note: since this was my first time baking a sheet cake, I was a little alarmed at how runny the batter was; however, I need not have fretted, since it was perfect by the time baking was done.


6. To prepare the icing, combine 6 tablespoons butter, the milk, and 1/4 cup cocoa in a saucepan.  Bring to a boil, stirring constantly.  Remove from heat and gradually stir in the powdered sugar, pecans, and 2 teaspoons vanilla extract.  Working quickly, pour over the hot cake, spreading to cover the cake evenly, and then cool completely on a wire rack.


You'll find that the icing is thinner than a frosting, but it will still set quickly once cooled, so work fast in this step, and don't make the icing in advance (i.e. while the cake is still baking).  I always find it helpful to sift powdered sugar for the smoothest consistency. 

*To prepare the buttermilk, place 1 and 1/2 teaspoons lemon juice in a liquid measuring cup.  Fill with plain non-dairy milk to equal 1/2 cup; let stand for 5 minutes to clabber (sour).  The acidity from the lemon juice is necessary to react with the baking soda, so don't substitute unclabbered milk in its place.

**To toast the nuts, cook in a small skillet over medium heat for about 5 minuets, shaking or stirring frequently, until toasted.

Nutrition Info:
20 servings (1 slice), Calories 298 

Tasting Notes:
I was forewarned by reading some reviews of classic Texas Sheet Cake, but yes - this is sweet.  Not even so much chocolaty as just sugary (though that's not necessarily a bad thing).  I would have preferred it with a classic fluffy chocolate frosting, instead of the icing, however.  As it is, the cake is almost more like a brownie.  I also thought there would be strong cinnamon flavor, but honestly it could use even more.  Perhaps I'll add cinnamon extract to the icing in place of vanilla extract next time.  These are quibbles.  Sugar + chocolate + Earth Balance butter = yum.

Rating:
4

Tuesday, July 17, 2012

Eggplant and Tomato Gratin

When it comes to using produce from the farmers' market, I've made summer recipes featuring watermelon, cucumbers, peaches, and green beans, to name a few.  This vegetable gratin, with layers of Japanese eggplant, plum tomato, and zucchini, definitely benefits from the best, freshest veggies you can find.  I baked this recipe in an 8-inch dish, but you could also prepare the gratins in individual dishes for a whimsical feel.

Ingredients:
  • 1 pound Japanese eggplant*
  • Cooking spray
  • 1/4 teaspoon salt
  • 1/2 cup grated vegan cheese
  • 2 teaspoons chopped fresh oregano
  • 1/4 teaspoon black pepper
  • 4 minced garlic cloves
  • 6 plum tomatoes
  • 2 medium zucchini
1. Cut the eggplant diagonally into 1/4-inch thick slices, and arrange in a single layer on a baking sheet coated with cooking spray.  Coat the eggplant with cooking spray and sprinkle with the salt.  Bake at 375 degrees for 16 minutes, turning over halfway through.

2. While the eggplant bakes, combine the cheese, oregano, black pepper, and garlic in a bowl.


Note: I used Galaxy Foods' vegan mozzarella block tonight, which shreds nicely like fresh Parmesan.  Any white, shreddable vegan cheese would work in its place.

3. Cut the plum tomatoes and zucchini into 1/4-inch thick slices; set aside.  Arrange half of the eggplant slices in the bottom of an 8-inch square baking dish coated with cooking spray.  Top evenly with half of the tomato slices, followed by half of the zucchini slices.  Sprinkle with half of the cheese mixture.  Repeat the layers: the remaining eggplant, the remaining tomatoes, the remaining zucchini, and the remaining cheese mixture.


4. Cover and bake at 375 degrees for 1 hour.  Uncover and bake a final 10 minutes - the vegetables should be very tender.

The suggested serving makes small, side portions, but you can double servings in a pinch to make this your entree.  However, I liked serving it as part of a big summer repast - a fresh green salad tossed with bottled dressing from Organicville, crispy breadsticks, and this simple angel hair pasta with fresh herbs: in a bowl, toss together 8 cups hot cooked angel hair pasta, 1 cup chopped fresh basil, 1/2 cup shredded vegan cheese (I used leftover Galaxy mozzarella), 2 tablespoons olive oil, 1/2 teaspoon salt, 1/2 teaspoon crushed red pepper, and 3 minced garlic cloves.


*My market had Japanese eggplant - longer and thinner than globe or Italian eggplants - which makes for evenly-sized slices, but you can use globe eggplants instead if you prefer.


Nutrition Info:
8 servings (1/8 of the gratin), Calories 87

Tasting Notes:
This dish had the same flavors as a classic French ratatouille but in a less watery version, and I really enjoyed the play on the theme.  Easily some of the best eggplant I've ever had (not sure if that is the Japanese variety, which I've eaten little of, or the preparation, or both, but wow!)  A great way to highlight the veggies, since so little is added to them, and a wonderful pop of fresh oregano to each bite.  I would add a drizzle of olive oil, a touch more salt, and more fresh garlic, to take this dish from good to great.  The topping also seemed to be crying out for breadcrumbs - just a sprinkle - for crunch on top.

Rating:
3.5

Monday, July 16, 2012

Peach Cooler

Part-beverage, part-Italian ice, consider this a slushy for grown ups.  It's the perfect way to use all those super-fresh peaches you've picked up at the farmers' market.

Ingredients:
  • 3 cups peeled and coarsely chopped peaches
  • 1 and 1/2 cups water, divided*
  • 3/4 cup vegan sugar
  • 2 tablespoons fresh-squeezed lemon juice
  • 2 tablespoons white rum
1. Combine the peaches and 1/2 cup water in a blender or food processor; process until smooth.  Transfer to a sieve, and strain into a bowl, pressing with a spatula.  Discard the solids.

Note: the 'solids' are the coarse bits of peach flesh that don't puree all the way down, so you're left with a smooth peach liquid.  The final product should have the result of a strained soup.


2. Meanwhile, combine the remaining 1 cup water and the sugar in a saucepan.  Bring to a boil.  Remove from heat and stir in the peach mixture, lemon juice, and rum.  Pour the mixture into an 8-inch square baking dish.  Cover and freeze until firm - at last 4 hours, but you'll probably need closer to 7 or 8 hours.  The mixture should no longer be liquid, but it also shouldn't be frozen so solid that you can't remove it from your baking dish.


3. Transfer the mixture to a food processor and process until slushy - at this point it looks like a blended daiquiri or frozen margarita.  


4. Return to the baking dish and return to the freezer for at least 3 hours.  Let stand in the fridge for 30 minutes to soften slightly before serving.  I enjoyed serving with straws for a fun presentation.


*Although it doesn't matter so much for the 1 cup water that gets boiled, I recommend using filtered water for the 1/2 cup pureed with the peaches.  Since that portion of water is never heated, you'll want to be sure it contains no impurities.  Tap water is fine, on the other hand, for 1 cup water that comes to a boil.

Nutrition Info:
8 serving (2/3 cup), Calories 109 

Tasting Notes:
Peachy keen!  Which I mean quite literally - the taste of fresh peaches shining through.  I worried this would be too sweet, and although borderline, I ended up enjoying itDecrease the sugar to 1/2 cup if you want a little more peach, a little less sweet.  The lemon juice gave it a nice bright note, and the rum was only slightly distinguishable, so use more if you want this to be a cocktail-hour treat.  My only real complaint was with the texture.  In retrospect, I would serve just after pureeing until slushy, instead of returning to the freeze for another 3 hours.  By then, it really is more like a granita or sorbet than a drink.


Let stand at room temperature for about 20 minutes if you agree, and you'll wind up with something closer to this:

Rating:
3.5

Friday, July 13, 2012

Pasta with Herbed Goat Cheese and Cherry Tomatoes

Use the chive and garlic cream cheese from Galaxy Foods to create this creamy vegan goat cheese (full recipe below).  This pasta is very similar to one my mom used to serve in the summer - warm pasta, fresh tomatoes, basil, and not much else!  If you don't have cherry tomatoes on hand, any small variety such as grape tomatoes would work too.

Ingredients:
  • 12 ounces uncooked angel hair pasta
  • 6 tablespoons prepared garlic and herb-flavored vegan goat cheese*
  • 1/3 cup chopped fresh basil
  • 1/4 teaspoon salt
  • 1/4 teaspoon black pepper
  • 1 tablespoon olive oil
  • 1 and 1/2 teaspoons bottled minced garlic
  • 2 cups halved cherry tomatoes
  • 2/3 cup vegan chicken broth (such as Imagine)
1. Cook the pasta according to package directions.  Drain and transfer to a large bowl.

Note: keep in mind that the thin strands of angel hair (also called capellini) cook much quicker than other pasta shapes - in only about 3 to 4 minutes - so be sure not to overcook.

2. Add the prepared goat cheese, basil, salt, and black pepper to the pasta.  Stir to combine; the goat cheese mixture will melt into the noodles.  It's helpful to distribute the 6 tablespoons evenly about the noodles, so that they disperse as evenly as possible.


3. Meanwhile, heat the olive oil in a large skillet over medium-high heat.  Add the garlic and saute for 30 seconds.  Add the tomatoes; cook for 2 minutes, stirring frequently.  Add the broth and cook for a final minute.  


4. Add the tomato mixture to the pasta mixture, and toss to combine. I liked adding extra sprigs of basil to each serving as a garnish. 


*To prepare the goat cheese, combine 3 ounces crumbled vegan feta (such as Veg Cuisine), 2 tablespoons chive and garlic-flavored vegan cream cheese, 1 tablespoon vegan sour cream, and a splash of lemon juice; mix with a fork until blended.  Use 6 tablespoons for this recipe, and save the remaining goat cheese for another use (it's delicious over bagels or English muffins as a creamy spread).

Nutrition Info:
4 servings (about 1 and 1/2 cups), Calories 372 

Tasting Notes:
Delicious pockets of the herbed goat cheese, and a nice coating of the broth on the pasta, but aside from that, the dish was surprisingly blander than I expected.  I would add a bit more olive oil, or broth - or both - since the pasta was also a touch dry, and an extra pinch of salt.  Still, super-fresh basil and tomatoes, and my only other recommendation is to use more of both.  There's definite potential here, and still a very nice summer supper. 

Rating:
3

Update:
Since I also had a batch of organic grape tomatoes, I made this one more time. As you can see, the two versions are nearly identical:


Except for the oblong shape of the grape tomatoes.


Tuesday, July 10, 2012

Shrimp Salad with Mango and Avocado

Just the presentation of this dish makes me feel like I'm at a pampered spa, instead of my apartment.  It's the perfect light summer lunch.

Ingredients:
  • 4 quarts water
  • 27 ounces Sophie's Kitchen shrimp, thawed
  • 1/2 cup thinly sliced red onion
  • 3 tablespoons chopped fresh cilantro
  • 2 teaspoons grated lime rind
  • 2 tablespoons fresh-squeezed lime juice
  • 1 tablespoon olive oil
  • 1/2 teaspoon salt
  • 1/4 teaspoon black pepper
  • 1 seeded and minced jalapeno pepper
  • 2 ripe mangoes
  • 1 avocado
  • 6 cilantro sprigs (optional for garnish)
1. Bring the water to a boil in a Dutch oven.  Add the shrimp and cook for 2 to 4 minutes, until cooked through.  Drain, rinse with cold water and transfer to a bowl.  Chill thoroughly (about 1 hour).

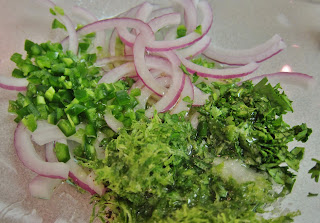
2. Combine the red onion in a large bowl with 3 tablespoons cilantro, the lime rind, lime juice, olive oil, salt, black pepper, and jalapeno.  Add the shrimp and toss to coat.


3. Peel the mangoes and cut into 6 wedges each.  Peel the avocado and cut into 12 wedges.

4. Spoon 3/4 cup shrimp mixture into the center of each of 6 salad plates.  Arrange 2 mango slices and 2 avocado slices like the spokes of a wheel around the shrimp.  Cilantro sprigs make a lovely garnish, if desired.

Try serving with your favorite vegan cheese and crackers on the side:


Or chips and salsa add a bit more of a southwestern feel:


Nutrition Info:
6 servings (3/4 cup shrimp mixture, 2 mango slices, 2 avocado slices), Calories 257 

Tasting Notes:
Eating this was like a day at the spa.  Use the ripest mango and avocado you can find and bellisimo - especially when combining a bite of both with a morsel of shrimp.  I would play up the lime factor in the dressing next time, and also toss the mango and avocado in a little lime juice so the salad is better dressed. This salad is perfect with a glass of crisp (vegan) white wine on the side.  

Rating:
3.5